How to take an iPhone screenshot on a Mac, with the device frame
To take an iPhone screenshot on a Mac, connect the phone with a cable, unlock it, and use an app that reads its screen over USB. Yado does this with Take Screenshot, which saves a PNG of the screen inside the iPhone's own frame to the Desktop and copies it to the clipboard. If you only need the plain screen, the iPhone's buttons plus AirDrop or iCloud Photos work without any Mac software. For a video instead of a still, QuickTime Player records the phone.
Start with what Apple provides
On the iPhone itself, Apple's screenshot guide says to quickly press and release the side button and the volume up button at the same time. On iPhone SE, press the Home button and the side button together. The screenshot lands in your photo library, under Collections, Media Types, Screenshots in Photos. From there you can move it to the Mac with AirDrop or let iCloud Photos sync it. Both work, and both give you a plain rectangle of pixels with no phone around it.
QuickTime Player is the Mac-side route. Apple's movie recording guide says to connect the device, open QuickTime Player, choose File, New Movie Recording, then pick the connected iPhone under Camera in the recording options. That shows the live screen and saves a movie file. It is the right tool for a screen recording; for a single still, the phone's own buttons are simpler.
iPhone Mirroring, included with macOS Sequoia 15 and later, lets you use the phone from the Mac. Apple's iPhone Mirroring page lists its conditions, among them a Mac with Apple silicon or the Apple T2 Security Chip, an iPhone on iOS 18 or later with a passcode, locked and near the Mac, both signed in to the same Apple Account with two-factor authentication, and Bluetooth and Wi-Fi on, and it is currently unavailable in the European Union. It is built for using the phone, not for exporting a framed picture of its screen.
Xcode and its Simulator are for developers who already have that toolchain. If you are writing an app, that is the right place for App Store pictures. For everyone else, installing Xcode to get one screenshot is a lot of disk and setup.
What Yado adds
Two things the routes above leave out. The first is the device frame: the picture comes out as the phone, not a rectangle, which suits a slide, a tutorial or a bug report. The second is that nothing passes through the phone's photo library, so there is no screenshot sitting in Photos and no AirDrop step. It needs a cable, and it needs the Mac running macOS 14 or later.
Connect the iPhone by USB, unlock it, and accept the trust prompt if it appears (see iPhone not showing up on Mac if it does not). Then take the screenshot from any of three places:
- Click the Yado logo at the left of the tab bar and choose Take Screenshot.
- In the Mac menu bar, open the iPhone menu and choose Take Screenshot, or press Shift-Command-S.
- On Overview, move the pointer onto the drawn iPhone. A Take Screenshot button appears under it.
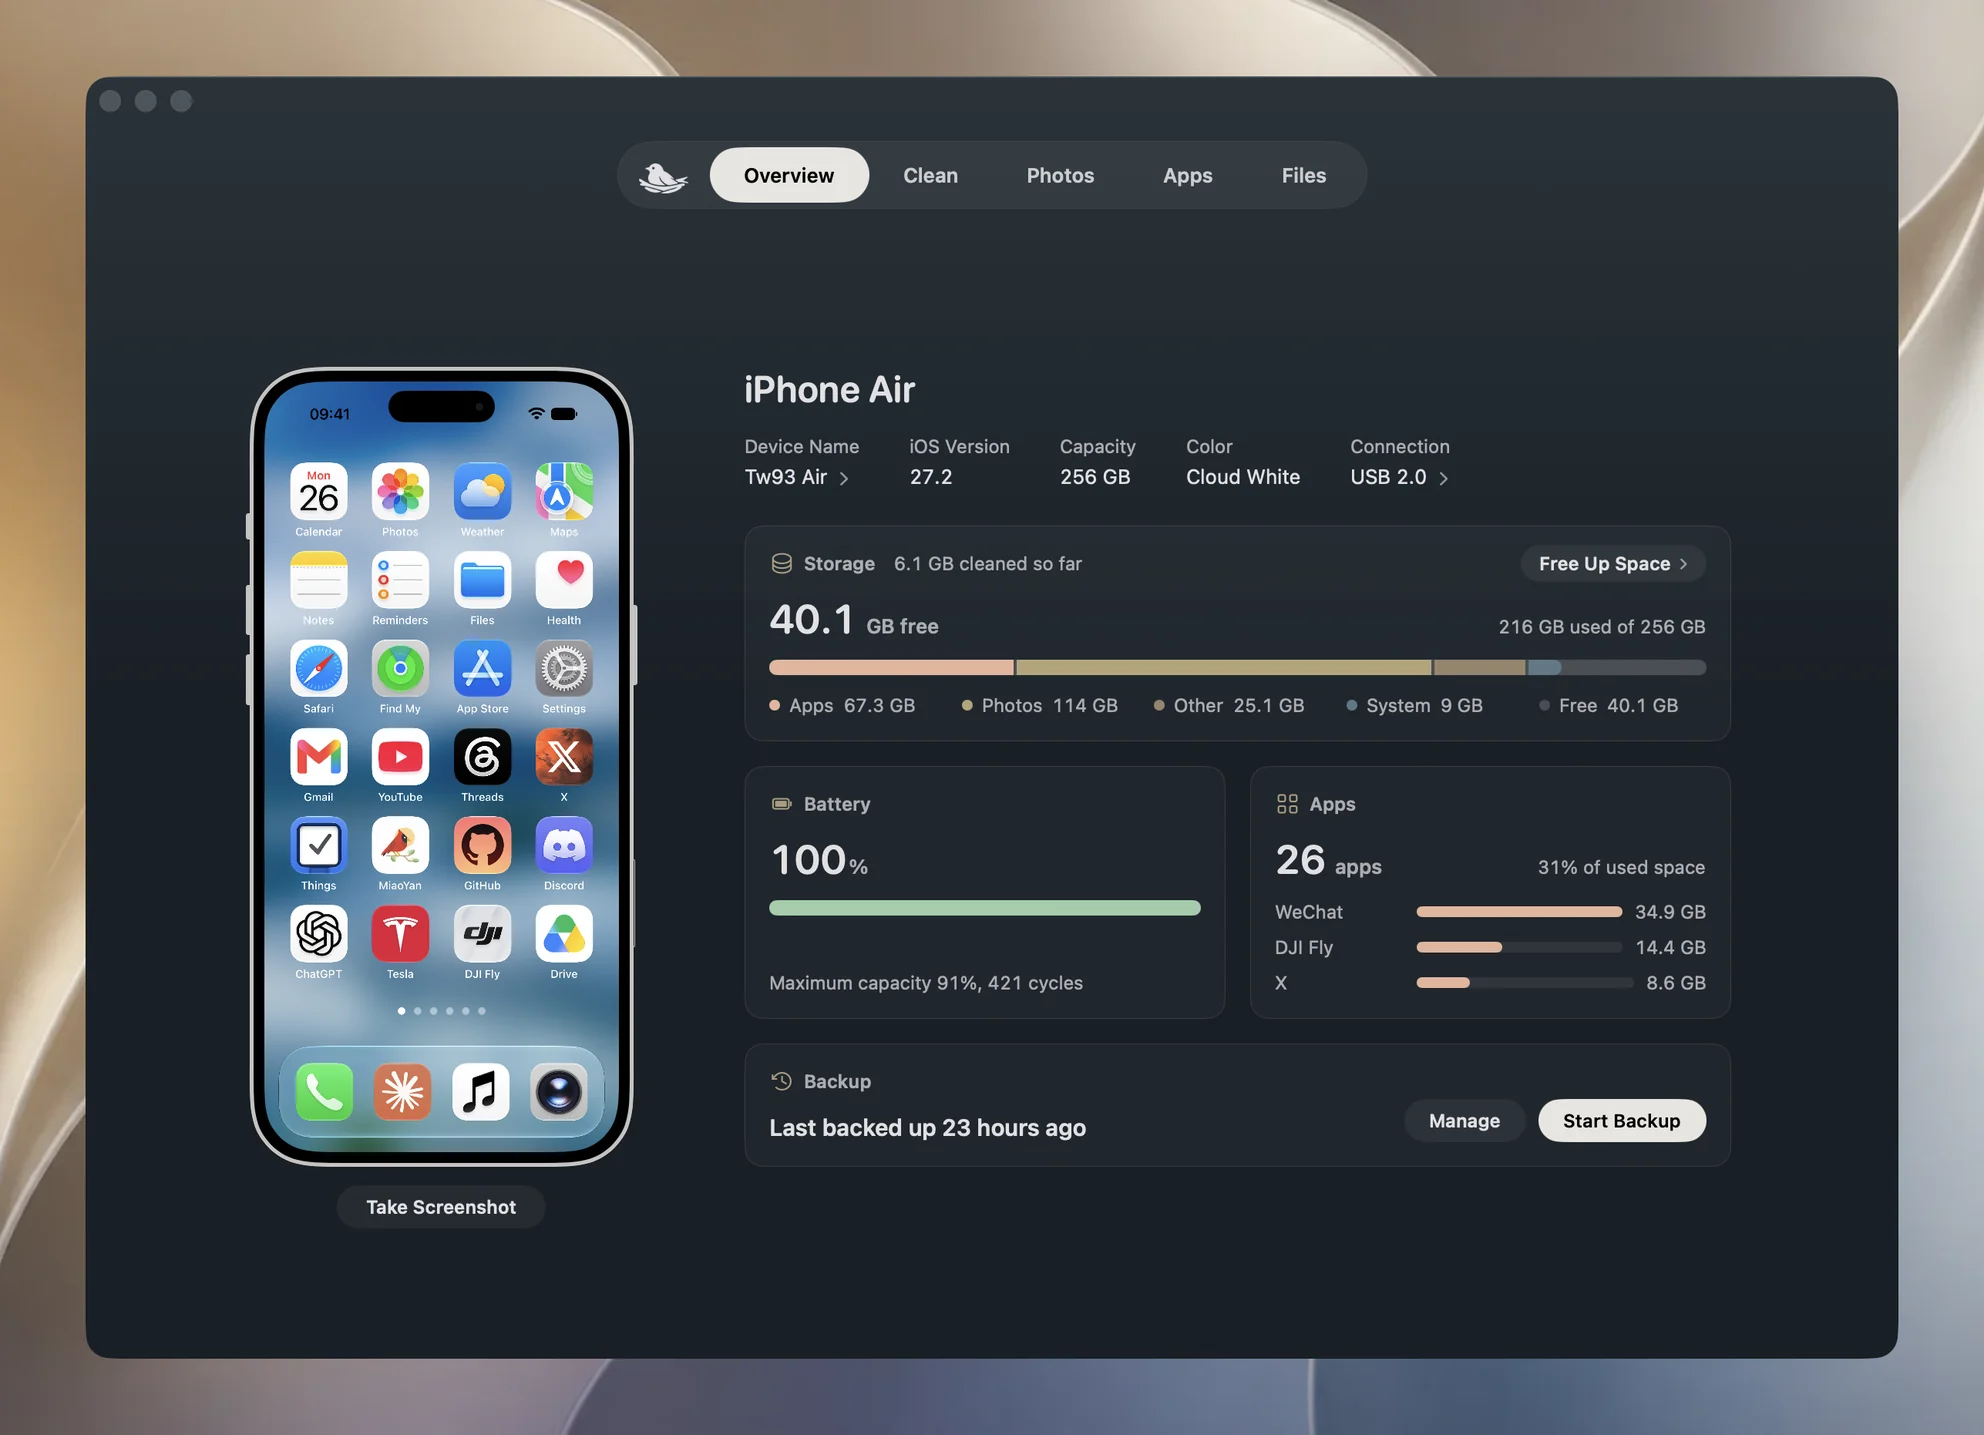
When the capture finishes, the screenshot button reads Saved to Desktop for 3 seconds and the framed picture is copied too, ready to paste. Click the button to see the file in Finder. From another page or the menu bar, Screenshot saved to Desktop appears at the foot of the window instead, with Show in Finder beside it. Paste it straight into Keynote, Pages, a bug tracker or a chat.
The file is named after the phone and the time, in the form <phone name> Screenshot 2026-10-28 09.41.00.png. If a file with that name exists, Yado adds 2, 3 and so on, and never overwrites it. A slash in the phone's name is replaced with a hyphen so the name stays a valid file name.
How it works
Yado reads the screen the same way QuickTime does when you choose the iPhone as a camera. macOS lists a cabled iPhone as a capture device once an app allows screen capture devices, which Yado does first, and Yado uses CoreMediaIO and AVFoundation to open that device, skips the first few frames, which can still be the previous picture or black, and keeps the next usable one. It does not use the screenshotr service, which needs a Developer Disk Image mounted on the phone. That is why this route needs neither a developer image nor an Xcode setup.
Because the channel is QuickTime's, macOS treats it like QuickTime: the first time, it asks for Camera access.
The capture device has a unique ID of its own that has nothing to do with the phone's UDID, so Yado finds the phone by the name Finder shows, the name of the phone as it appears there. If two cabled phones share one name, Yado does not guess which one you meant and stops with a message. Unplug the other phone and try again.
The frame is drawn from the model. Yado has frames for the iPhones from the iPhone 6s Plus and the first iPhone SE to the newest models, Home button models included, and a newer model it does not know yet borrows a recent frame, the newest one Yado knows from the same generation, else the newest of all. The screen is placed in the frame at its native pixel size, with a transparent background and a small margin so the side buttons are not cut off. The result is saved as a PNG, which keeps the transparency, so it sits cleanly on a slide of any color.
When it does not work
Camera access is denied. The card says reading the screen needs Camera access, the same one QuickTime uses. Click Open System Settings, which opens Privacy & Security, Camera, and turn Yado on. Then try again.
"Couldn't read the iPhone's screen. Unlock it and try again." This appears when no capture device turned up within about eight seconds, or when the device opened and sent no picture, as a phone with its screen off does. Unlock the phone, check that it is trusted, and keep the cable plugged in. If the phone does not appear in Yado at all, the problem is earlier; the connection troubleshooting covers it.
The picture could not be saved. The card says the picture could not be saved to the Desktop. Check that the Desktop folder is writable, then take the screenshot again.
The button is missing or greyed out. The screen comes over the cable only. If the phone is connected over Wi-Fi, the Overview button and the logo menu row are not offered, and the menu bar item is dimmed. Plug in the cable. The Wi-Fi guide explains what wireless connections can and cannot do. The item is also dimmed while a capture is already running.
FAQ
Do I need Xcode or a Developer Disk Image?
No. Yado reads the screen through the channel QuickTime uses, not through screenshotr, which needs a Developer Disk Image. You only need the cable and Camera access.
Can I get the screenshot without the frame?
Not from Yado's button, which always draws the frame. The iPhone's own buttons give you the plain screen.
Does it need the iPhone to be unlocked?
Keep it unlocked. Yado's message on a failed read asks you to unlock the phone and try again, and a phone with its screen off sends no picture.
Is the screenshot kept in the iPhone's Photos?
No. It goes to the Mac only, to the Desktop and the clipboard.